ps:这篇文章是Hexo的搭建和后续优化等踩坑经验记录
点此展开next5.1.4旧版本环境下适用的内容
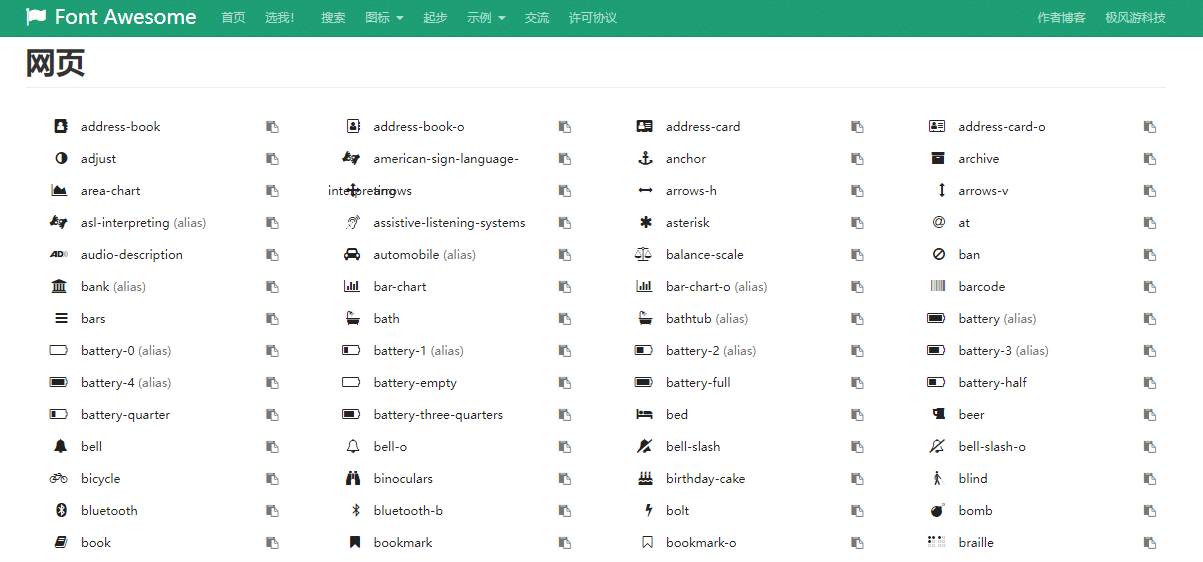
1.next图标(Next 5.1.4旧版本适用 )
next用的是FontAwesome的图标库,先确定next主题内的FontAwesome版本
1 打开themes\next\source\lib\font-awesome\css\font-awesome.css
我的是4.7版本,打开https://fontawesome.dashgame.com/,选择自己的版本
选择自己喜欢的图标点击右边的复制使用,但会发现用不了。其实只要把复制的名字中的"fa-"部分去掉就行了,只需要后面的部分。比如fa-buth就要改成单独的buth
Next 8新版本
在引用图标时候不要去掉fa-,直接在fa-xx前面加个fab,格式为
fab fa-xx
2.next主页文章摘要,文章内文字分行但摘要不换行
在md文件内要换行的地方加上
有时候用br标签不管用,在后面加
3.(Next旧版本5.1.4才适用,新版本已修复 )
hexo的next主题,在点击头像下面的日志时无法正常跳转,显示cannot get archives%7C%7C%20archive
打开/themes/next/layout/_macro/sidebar.swig,找到这里
1
2
3
4
5
6
7
8
9
10
11
12
{% if config.archive_dir != '/' and site.posts .length > 0 %} <div class ="site-state-item site-state-posts" > {% if theme.menu .archives %} <a href="{{ url_for(theme.menu.archives).split('||')[0] | trim }}" > {% else %} <a href="{{ url_for(config.archive_dir) }}" > {% endif %} <span class ="site-state-item-count" >{{ site.posts .length }}</span> <span class ="site-state-item-name" > {{ __('state.posts') }}</span > </a> </div> {% endif %}
改为
1
2
3
4
5
6
7
8
{% if config.archive_dir != '/' and site.posts .length > 0 %} <div class ="site-state-item site-state-posts" > <a href ="{{ url_for(config.archive_dir) }}" > <span class ="site-state-item-count" > {{ site.posts.length }}</span > <span class ="site-state-item-name" > {{ __('state.posts') }}</span > </a > </div> {% endif %}
也就是把原来的第3、4、5、7行删掉。
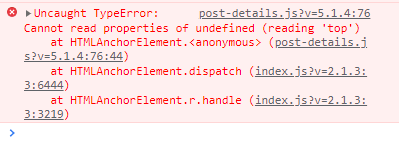
4.(next旧版本才适用,新版本已修复该bug )
next文章点目录树不跳转打开F12点击目录树显示错误
找到\themes\next\source\js\src\post-details.js,打开文件
找到文件的72行左右
1 2 3 4 $('.post-toc a' ).on ('click' , function (e ) { e.preventDefault (); var targetSelector = NexT .utils .escapeSelector(this .getAttribute ('href' )); var offset = $(targetSelector).offset ().top ;
在第三行下加一行代码,变为
1 2 3 4 5 $('.post-toc a' ).on ('click' , function (e ) { e.preventDefault (); var targetSelector = NexT .utils .escapeSelector(this .getAttribute ('href' )); targetSelector = decodeURI (this .getAttribute ('href' )) var offset = $(targetSelector).offset ().top ;
这样点击目录树可以跳转了。
5.(是Next5.1.4旧版本的权宜之计,在更新Next 8新版本后问题得到解决。强烈推荐更新 )
文章目录只显示同级目录,不能显示多级目录
语法要求是:在写md文件的时候标题有h1到h6,目录之间不能跳级跨级。比如h1就后面只能h2,不能h1下面接着h3。
同时,next5.1.4版本有Bug,当目录名为中文的时候就无法展开下一级目录。这个目前还无法修复,只能暂时使用英文来代替,或者用html语言跳转方法绕过bug
先在要跳转到的位置写上
1 <a id=""></a> 在""之间写一个任意的跳转ID
文章显示的时候不会把这串代码显示出来,所以直接在后面写你自己跳转显示部分的内容就行了。
在设置跳转按钮的地方写上
1 [链接名称](#锚点id) 链接名称任意选,id面前记得有一个#号
6.新版本Next已经支持内置显示文章更新时间
显示文章更新时间
只有发布时间其实是不够准确的。我们需要一个能够显示更新时间功能。
1 打开themes\next\layout\_macro\post.swig
找到这段
1
2
3
4
5
6
7
8
9
10
11
12
13
<div class ="post-meta" > <span class ="post-time" > {% if theme.post_meta.created_at %} <span class ="post-meta-item-icon" > <i class ="fa fa-calendar-o" > </i > </span > {% if theme.post_meta.item_text %} <span class ="post-meta-item-text" > {{ __('post.posted') }}</span > {% endif %} <time title ="{{ __('post.created') }}" itemprop ="dateCreated datePublished" datetime ="{{ moment(post.date).format() }}" > {{ date(post.date, config.date_format) }} </time > {% endif %}
改为
1
2
3
4
5
6
7
8
9
10
11
12
13
14
15
16
17
18
19
20
21
<div class ="post-meta" > <span class ="post-time" > {% if theme.post_meta.created_at %} <span class ="post-meta-item-icon" > <i class ="fa fa-calendar-o" > </i > </span > {% if theme.post_meta.item_text %} <span class ="post-meta-item-text" > {{ __('post.posted') }}</span > {% endif %} <time title ="{{ __('post.created') }}" itemprop ="dateCreated datePublished" datetime ="{{ moment(post.date).format() }}" > {{ date(post.date, config.date_format) }} </time > {% endif %} {%if post.updated and post.updated > post.date%} <span class ="post-updated" > | {{ __('post.updated') }} <time itemprop ="dateUpdated" datetime ="{{ moment(post.updated).format() }}" content ="{{ date(post.updated, config.date_format) }}" > {{ date(post.updated, config.date_format) }} </time > </span > {% endif %}
1 再打开\themes\next\languages\zh-Hans.yml
在post栏处加上一行
1 再打开\themes\next\_config.yml
文件最后处加上
1.要注意常用多用hexo cl这条命令,有时候不清理之前的缓存,bug和问题就一直存在,在部署之前都最好先用一用cl清除缓存。
2.在安装了主题后不能使用是因为hexo5.0之后删除了swig,需要自己安装。
3.在github的库中是main而不是master目录,记得在_config.yml中branch: 一栏的master改为main
4.在部署之后github会审核一次才会更新内容,需要等待,审核过程可以在仓库的action一栏查看过程。只有三个绿才会更新网站。
5.实际上hexo中心在本地,只是提交到了Github上,所以其部署过程全按照你本地的文件来部署,你本地是多少上面仓库就会变成和本地一样,你在本地删了文件仓库也会删掉那个文件。所以删文章是在本地进行,然后再部署就行了。
6.在建站时部署前可以开hexo s命令监测,如果有什么错误可以第一时间排查解决,否则很难一个一个扒开来看。
7.背景头像等图网上的教程都是插入本地图片,这样上传到github上打开很慢,建议把图片文件改为图床里的url,能加快速度(只要在相应的配置文件下的命令下)
在括号内输入自己的图片外链或者本地图片路径(不推荐本地图片,速度慢)(如用本地图片路径则填的路径是/image/XXX.jpg,前面的绝对路径不用写)
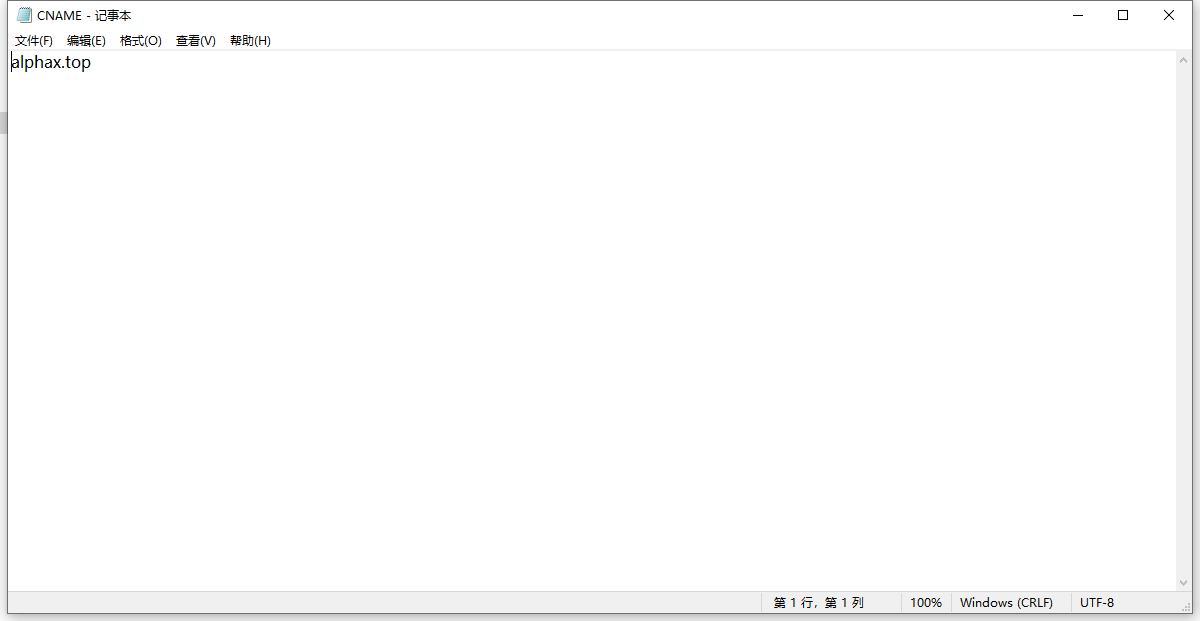
8.每次上传到github上,自己的自定义域名总是不绑定对应xxx.github.io的仓库,可以在source文件夹下面新建一个名叫CNAME的txt,在里面写入自己的域名
然后保存去掉后缀名
这样之后hexo d上传不会再需要手动加自定义域名
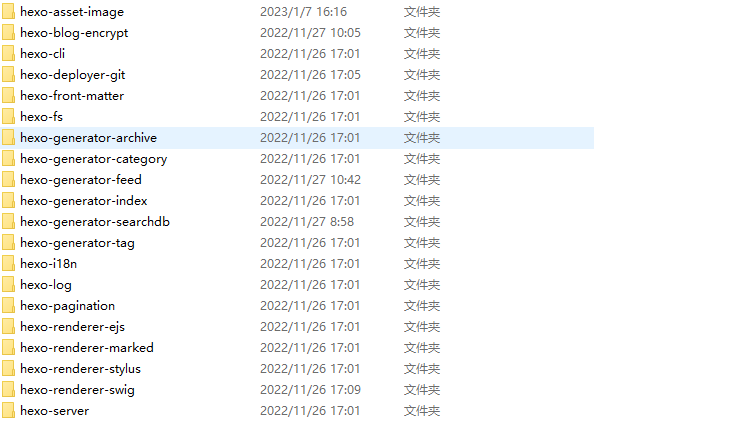
9.查看自己的hexo安装了多少插件和如何删除
hexo插件安装路径在根目录下的node_modules文件夹里面含有全部插件和自己的一些依赖包,插件都是hexo-XXXXX开头的
卸载就是和npm install一样,命令改为
同样的,可以考虑加与不加--save参数
卸载的时候记得查看一下残留在根目录和主题的_config.yml内的插件内容
和文章md文件开头插件所添加的一些信息
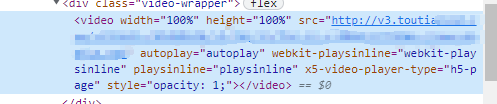
10.在博客内嵌入视频:
首先是b站,可以在旧版网页版中点分享获取嵌入代码
如果是自己的视频可以在自己的创作中心中点要嵌入的稿件的分享按钮获取嵌入代码
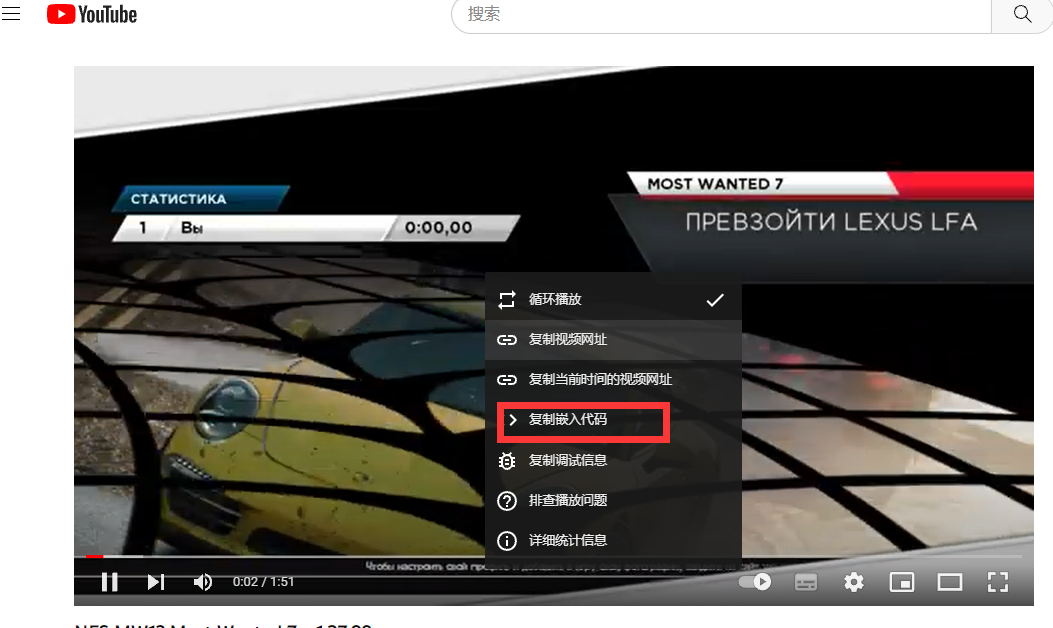
YouTube则更简单,点开任意一个视频右键获取嵌入代码即可
其他平台大同小异,核心是获取嵌入代码(即iframe代码)。
在markdown文章中编辑嵌入视频的大小:只要在代码内加入width=XXX height=XXX(X为数值)即可调整大小。
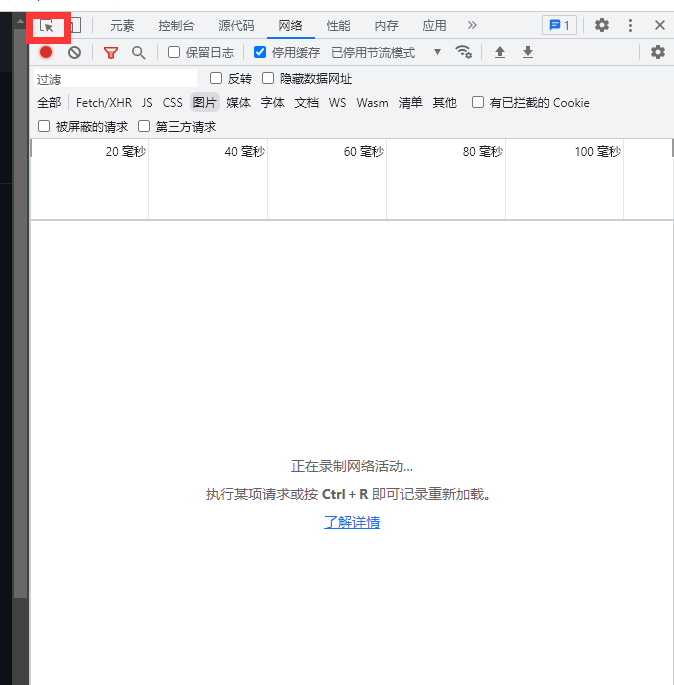
在F12调试工具中打开这个点击网站中想要分析的部分,会跳到html相关部分的源代码。比如点击视频也许就有机会直接找到外链,下载视频。
成功案例
11.让博客首页文章摘要只显示图片和空白
next的文章摘要会跳过图片而直接把文字放在摘要,如果要只显示一张图片,只需开头插入图片,在图片末尾回车,切换到下一行输入
这是手动断阅读摘要选取长度的标志,往后面的文字就不会显示在首页文章摘要了。发现网络上很多文章里这条命令都是错的,或者格式不对。--后和--前都应该是有一个空格才对。
如果这条命令输入正确的话,在Typora里面这条命令会变成蓝色。
如果想让文章显示空白简介的话,在文章第一行打几个空格(至少四个空格),然后第二行打more截断。
12.在hexo-asset-image的加持下快速插入多张本地图片
直接将本地图片拖入相对应的文件夹内,然后把图片拖入typora中。这时直接拖图片进来显示的路径是绝对路径。在Typora中打开源代码模式全选复制
再把复制到word中,利用word的“替换”功能,把绝对路径前面部分替换成无
再把代码拖入typora即可(不过现在用图床,这个插件可以说基本用不上了)
13.Hexo对花括号的支持很差,很容易出问题,能不在md文件中使用花括号就不使用。否则有可能出现hexo d部署之后文章只显示一部分的bug。
14.hexo-blog-encrypt这个博文密码加密插件,在使用next主题的情况下,加密博文打开后不会有目录树功能。
关于这个bug,作者已经在github的 readme 上写了解决办法
然而next主题是没有这个文件的
参考:https://github.com/D0n9X1n/hexo-blog-encrypt/issues/58
next对应的,找到themes\next\layout\_macro\sidebar.njk"中的第四行
1 {%- set toc = toc (page.content , {class : 'nav' , list_number : page.toc .number , max_depth : page.toc .max_depth }) %}
换成
1 2 3 4 5 {%- if page.encrypt == true %} {%- set toc = toc (page.origin , {class : 'nav' , list_number : page.toc .number , max_depth : page.toc .max_depth }) %} {% else %} {%- set toc = toc (page.content , {class : 'nav' , list_number : page.toc .number , max_depth : page.toc .max_depth }) %} {%- endif %}
不过这样,加密的文章目录在输入正确密码之前也会显示出来,toc功能正常能用了但暴露了toc的内容,看自己怎么取舍。
15.在md编辑器中打一行空格实际上在网页里是没有空行的,要做出空行来,请在空行输入
16.在除了侧边栏以外区域显示文章目录:
安装插件
1 npm install hexo-toc --save
再在config里加以下内容
1 2 3 4 5 6 7 8 9 toc: maxdepth: 3 class: toc slugify: transliteration decodeEntities: false anchor: position: after symbol: '#' style: header-anchor
接着直接在md文章内要显示文章目录的地方加上
这个显示的效果等效于在csdn许多文章开头显示的的内容目录。
但是使用这个插件会和next侧边栏的目录冲突,导致Next的侧边栏目录树不能正常跳转
可以使用这个插件的修改版:https://github.com/erictt/hexo-toc-dllcn ,防止了和next侧边栏导航的冲突。
安装插件(记得先卸载上面的原hexo-toc插件):
在根目录的config文件下添加
1 2 3 4 5 6 7 mdtoc: maxdepth: 3 class: toc decodeEntities: false anchor: symbol: '#' style: header-anchor
用法和原hexo-toc一样,都是在文章需要添加目录的地方输入
Next文章目录的标题开头第一个字不要使用特殊符号,否则有可能造成无法点击目录树跳转。
但是使用这个插件的时候会有几个问题。
第一个是标题内英文必须全小写,否则无法跳转。同时基本上标题几乎不能有任何标点符号,否则都有可能无法跳转。
或者使用其他markdown生成toc目录的项目,github上面有很多,比如markdown-toc,但是hexo-toc插件比这些项目都更傻瓜化,使用方法更简单。
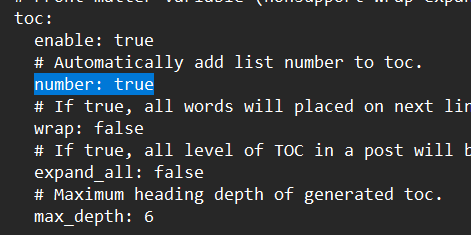
next自带的目录树会自动在目录前面加数字,因为个人更喜欢自己添加序号,不太喜欢这个功能
可以在config里面关闭自动添加数字
把number一项改为false
同时,expand_all: true可以让文章的目录默认全部展开
17.关于在typora内写文章
在一行文字后回车,下一行的文字和上一行的文字会有间隔,取消间隔的办法是shift+回车,这样上下行之间就没有间隔了。
18.在文中折叠部分内容
格式如下:
1 2 3 4 <details> <summary>点击展开折叠内容</summary> **** </details>
第一个<summary>标签前要打四个英文空格<summary>标签之间写折叠的提示信息****处意味着要写入的被折叠信息。可以多行等操作。<details>改为<details open>
2024.5.23
也可以使用插件,我觉得不好用。hexo-sliding-folding hexo-hide
前者不能嵌套折叠,后者太过简陋https://github.com/theme-next/hexo-theme-next/pull/1489
themes\next\scripts\tags文件夹下新建一个folding.js文件
1 2 3 4 5 6 7 8 9 10 11 12 13 14 15 16 17 18 19 20 21 22 23 24 25 26 27 28 29 30 31 32 33 34 35 36 37 38 39 40 41 42 43 44 'use strict' ;function postFolding (args, content ) { args = args.join (' ' ).split (',' ); let style = '' let title = '' if (args.length > 1 ) { style = args[0 ].trim () title = args[1 ].trim () } else if (args.length > 0 ) { title = args[0 ].trim () } if (style != undefined ) { return `<details ${style} ><summary> ${hexo.render.renderSync({text: title, engine: 'markdown' }).split('\n' ).join('' )} </summary> <div class='content'> ${hexo.render.renderSync({text: content, engine: 'markdown' }).split('\n' ).join('' )} </div> </details>` ; } else { return `<details><summary> ${hexo.render.renderSync({text: title, engine: 'markdown' }).split('\n' ).join('' )} </summary> <div class='content'> ${hexo.render.renderSync({text: content, engine: 'markdown' }).split('\n' ).join('' )} </div> </details>` ; } } hexo.extend .tag .register ('folding' , postFolding, {ends : true });
themes\next\source\css\_common\scaffolding\tags下添加一个folding.styl
1 2 3 4 5 6 7 8 9 10 11 12 13 14 15 16 17 18 19 20 21 22 23 24 25 26 27 28 29 30 31 32 33 34 35 36 37 38 39 40 41 42 43 44 45 46 47 48 49 50 51 52 53 54 55 56 57 58 59 60 61 62 63 64 65 66 67 68 69 70 71 72 73 74 75 76 77 78 79 80 81 82 83 84 85 86 87 88 89 90 91 92 93 94 95 96 97 98 99 100 101 102 103 104 105 106 107 108 109 110 111 112 113 114 115 116 117 118 119 120 121 122 123 124 125 126 127 128 129 130 131 132 133 134 135 136 137 138 139 140 141 142 143 144 145 146 147 148 149 150 151 152 153 154 155 156 157 158 159 160 161 162 163 164 165 166 167 168 169 170 $gap = 16px $gap-h2 = 48px $gap-h3 = 32px $gap-h4 = 16px $gap-paragraph = 1rem $gap-row = .5rem $gap-card = $gap $border-codeblock = 4px $color-card = white $color-text = #555 $color-block = #f6f6f6 $fontsize-meta = .875rem $fontsize-list = .9375rem $color-p = #555 $color-md-blue = #e8f4fd $color-md-blue1 = rgba (33 ,150 ,243 ,0.3 ) $color-mac-cyan = #e8fafe $color-mac-cyan1 = rgba (27 ,205 ,252 ,0.3 ) $color-mac-green = #ebf9ed $color-mac-green1 =rgba (61 ,197 ,80 ,.3 ) $color-mac-yellow = #fff8e9 $color-mac-yellow1 = rgba (255 ,189 ,43 ,0.3 ) $color-mac-red = #feefee $color-mac-red1 = rgba (254 ,95 ,88 ,0.3 ) $time = 0. 28s details display : block padding : $gap margin : $gap-row 0 border-radius : $border-codeblock background : $color-card font-size : $fontsize-list transition : all $time ease -moz-transition : all $time ease -webkit-transition : all $time ease -o-transition : all $time ease summary cursor : url (/images/ ayuda.cur ),auto; padding : $gap outline :none; margin : 0 - $gap border-radius : $border-codeblock color : alpha ($color-p, .7 ) font-size : $fontsize-meta font-weight : bold position : relative line-height : normal >p, h1, h2, h3, h4, h5, h6 display : inline !important border-bottom : none !important cursor : url (/images/ ayuda.cur ),auto; &:hover color : $color-p &:after position : absolute content : '+' text-align : center top : 50 % transform : translateY (-50 %) right : $gap border : 1px solid $color-block > summary background : $color-block &[blue] border-color : $color-md-blue > summary background :$color-md-blue &[cyan] border-color :$color-mac-cyan > summary background :$color-mac-cyan &[green] border-color :$color-mac-green > summary background :$color-mac-green &[yellow] border-color :$color-mac-yellow > summary background :$color-mac-yellow &[red] border-color :$color-mac-red > summary background :$color-mac-red details[open] border-color : alpha ($color-p, .2 ) > summary border-bottom : 1px solid alpha ($color-p, .2 ) border-bottom-left-radius : 0 border-bottom-right-radius : 0 &[blue] border-color : alpha ($color-md-blue1, .3 ) > summary border-bottom-color : alpha ($color-md-blue1, .3 ) &[cyan] border-color : alpha ($color-mac-cyan1, .3 ) > summary border-bottom-color : alpha ($color-mac-cyan1, .3 ) &[green] border-color : alpha ($color-mac-green1, .3 ) > summary border-bottom-color : alpha ($color-mac-green1, .3 ) &[yellow] border-color : alpha ($color-mac-yellow1, .3 ) > summary border-bottom-color : alpha ($color-mac-yellow1, .3 ) &[red] border-color : alpha ($color-mac-red1, .3 ) > summary border-bottom-color : alpha ($color-mac-red1, .3 ) > summary color : $color-p margin-bottom : 0 &:hover &:after content : '-' > div.content padding : $gap margin : 0 - $gap margin-top : 0 p > a :hover text-decoration : underline > p, .tabs , ul, ol, .highlight , .note , .fancybox , details &:first-child margin-top : 0 &:last-child margin-bottom : 0
在同目录的index.styl下,在末尾添加一行
具体如何在文中用,themes\next\scripts\tags文件夹下的folding.js`文件的首几行已经有详细介绍,这里不多赘述。
19.在markdown内,可以用`来显示代码段内容,使其在文章中更为凸显。
效果展示:一个函数 print()
用法:
20.有时想修改博文但是由于post文件夹内的md文件名都是随便起的,找到对应的md文件总需要很多时间。
可以在备份到github上的hexo原文件的仓库来查找,复制对应博文的一部分文字到搜索栏中搜索即可。
21.关闭特定文章的评论区
在文章页头上添加
22.深色模式
next自带的深色模式不能切换,用第三方插件替换
1 npm install hexo-next-darkmode --save
config.yml里写
1 2 3 4 5 6 7 8 9 10 11 12 13 14 15 darkmode_js : enable : true bottom : '64px' # default : '32px' right : 'unset' # default : '32px' left : '32px' # default : 'unset' time : '0.5s' # default : '0.3s' mixColor : 'transparent' # default : '#fff' backgroundColor : 'transparent' # default : '#fff' buttonColorDark : '#100f2c' # default : '#100f2c' buttonColorLight : '#fff' # default : '#fff' isActivated : false # default false saveInCookies : true # default : true label : '🌓' # default : '' autoMatchOsTheme : true # default : true libUrl : # Set custom library cdn url for Darkmode .js
不过这个深色模式,还不如小米自带浏览器的深色模式功能。


 、
、